Build a Recommendation System using Python, Streamlit, & Azure
Build and Host your first Recommendation System on the Cloud
If you’re a movie buff, you would know how difficult it can be to find new flicks to watch. With so many options, it can be overwhelming to find what to watch, and that’s where a recommendation system may come in handy. Movie recommendation systems are specialized algorithms that suggest shows to users based on their past viewing history, preferences, and ratings.
These systems use a variety of techniques, including collaborative filtering, content-based filtering, and hybrid methods, to provide personalized, and accurate suggestions to users. These days, such systems are widely used by streaming giants like Netflix and YouTube, to serve their customers better.
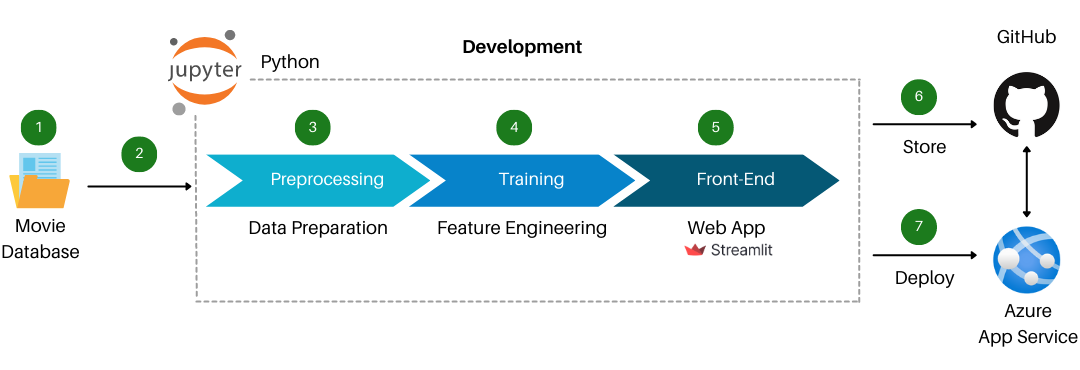
In this tutorial, we’ll walk through the process of building a content-based movie recommendation system using Python and the open-source library scikit-learn. We will use Streamlit to create a simple web app for interacting with our recommender system & finally, we’ll deploy our app using Azure.
What is a Recommendation System?
Recommendation systems are AI-powered tools that help predict the rating or preference a user would give to an item. Such systems may use a variety of algorithms, and data sources to make personalized recommendations to each user. These systems have become ubiquitous and can be commonly seen in online storefronts, streaming services, and social media platforms.
These systems use a variety of techniques to make recommendations, and the technique used in this tutorial is based on the content-based approach.
A content-based recommendation system recommends items based on the characteristics of that item and the user’s past preferences. These systems, represent each item (e.g., a movie) as a vector of its characteristics (e.g., genre, cast, director, etc.). For instance, if a user frequently watches action movies then the system would recommend other action movies to the user.
The second type of recommendation system is the collaborative filtering-based recommendation system. These systems analyze the viewing habits of other users who have similar preferences to the current user and use this information to make recommendations. Such systems tend to identify patterns & then make recommendations to users based on those patterns.
There also exists hybrid systems, that combine the power of both content-based filtering and collaborative filtering to make recommendations. Now that we’ve got the basics out of the way, let’s dive into building and hosting our very own movie recommendation system in just five easy-peasy steps.
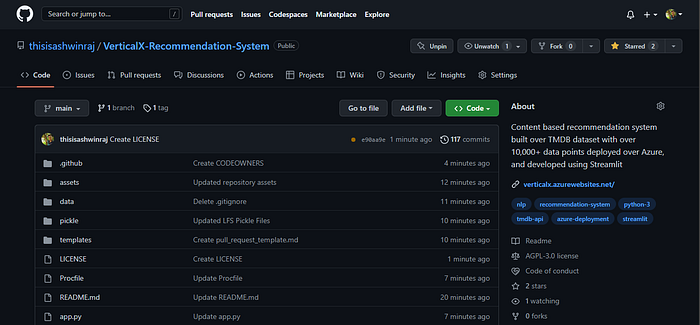
The entire code and other resources used for building the recommendation system are available on my GitHub repository. Feel free to take a look here.
Step 1 — Gather the Data for Training
The first step in building a recommendation system is to gather data. There are several publicly available datasets, such as the MovieLens data set, and the TMDb dataset. For this tutorial, we’ll be using the TMDb dataset, which contains data from over ten thousand popular movies around the world.
Google colab is a free, in-browser, collaborative environment that offers an interactive and easy-to-use platform to write and execute python programs. We’ll be using it to clean our dataset and train the recommendation model.
# Import python libraries
import numpy  as np
import pandas as pd

# Load dataset to pandas dataframe
df = pd.read_csv("tmdb_movies_data.csv")
To download the dataset, you will need to sign up for an account on Kaggle, and agree to their terms of use. Once done, download the dataset as a zip file. Now extract the zip file and read the dataset into your colab notebook.
Step 2 — Pre-Process and Clean the Data
Thereafter, select the columns required for training your model, and filter the data to remove any missing values. This is important because missing values can induce unwanted bias in the data. You can alternatively try using one of the imputers listed here. These are estimators to fill the null values.
# Select the key columns that'll be used while building the model
movies = df[['id','cast','director','genres','overview','original_title','keywords']]

# Drop any null values from the database
movies.isnull().sum()
movies.dropna(inplace = True)
Another important aspect of pre-processing the data involves cleaning and transforming the data to make it suitable for training the model. This is done by removing unwanted characters, duplicate data, and sparse values. Once done, stem your movie dataset to reduce the words to their root/base form.
# Function to transform the data to a standard format
def convert(obj):
    s = list(obj)
    for i in range(len(s)):
      if s[i] == '|':
        s[i] = " "

    temp_str = "".join(s)
    temp_list = temp_str.split()

    return temp_list

# Apply the convert function to all the columns
movies['genres'] = movies['genres'].apply(convert)
movies['keywords'] = movies['keywords'].apply(convert)
movies['overview'] = movies['overview'].apply(lambda x:x.split())
movies['cast'] = movies['cast'].apply(convert)
movies['director'] = movies['director'].apply(convert)

# Stem the data to reduce words to their base form
import nltk
from nltk.stem.porter import PorterStemmer
ps = PorterStemmer()

def stem(text):
    y = []
    for i in text.split():
        y.append(ps.stem(i))

    return " ".join(y)
Step 3 — Build the Recommendation Model
Once we have filtered the data, we will need to transform each movie into a vector. This process is called Text Vectorization, and the approach we’d use here is called the Bag of Words approach. There also exist a variety of other techniques for performing text vectorization such as TF/IDF and Word2Vec.
# Create a new column that combines all charecteristics of the movie
movies['tags'] = movies['cast'] + movies['genres'] + movies['director'] + movies['overview'] + movies['keywords']

# Create a new dataframe consisting of id, original title, and tags
new_df = movies[['id','original_title','tags']]
new_df['tags'] = new_df['tags'].apply(lambda x:" ".join(x))

# Apply the stem function to the tags column of your dataframe
new_df['tags'] = new_df['tags'].apply(stem)
Next, fit the model to the dataset after removing stop words. Stop words are small common words that are used in the text but carry very little meaning.
# Perform text vectorization after disregarding stop words
from sklearn.feature_extraction.text import CountVectorizer
cv = CountVectorizer(max_features=10000,stop_words='english')

# Transform the SciPy sparse matrix to NumPy array form
vectors = cv.fit_transform(new_df['tags']).toarray()
Mathematically, for any given vector, the recommendation system outputs the five closest vectors. Here, cosine distance is used in place of euclidean distance as in higher dimensionality, the former gives a better measure of distance. This is intermittently referred to as the “Curse of Dimensionality”.
# Calculate the cosine similarity between the vectors
from sklearn.metrics.pairwise import cosine_similarity

similarity = cosine_similarity(vectors)
After processing the results, make a pickle dump to save the python objects for later use in building the app. This is done using python’s pickle package.
# Take the pickle dump of the results for later use
import pickle

pickle.dump(new_df,open('movies.pkl','wb'))
pickle.dump(new_df.to_dict(),open('movie_dict.pkl','wb'))
pickle.dump(similarity,open('similarity.pkl','wb'))
Step 4 — Develop the Front-End
To develop the front end of our system, we’ll be using Streamlit - a powerful open-source library that allows you to create interactive web applications. We’ll also be using the built-in widgets and functions to create the interface
To get started, install streamlit in your environment, and create a file called app.py. This file will contain the code for designing the interface of the web application and for recommending movies. This is done by calculating the cosine similarity betwixt the movies and outputting the five closest vectors.
# Fetch the neccesary python modules
import streamlit as st
import pickle
import pandas as pd
import requests

# Recommend movies based on content
def recommend(movie):
    movie_index = movies[movies['original_title'] == movie].index[0]
    distances = similarity[movie_index]
    movies_list = sorted(list(enumerate(distances)), reverse=True, key=lambda x: x[1])[1:6]

    recommended_movies = []
    recommended_movies_poster = []

    # Fetch the posters for each recommended movie
    for  i in movies_list:
        movie_id = movies.iloc[i[0]].id
        recommended_movies.append(movies.iloc[i[0]].original_title)
        recommended_movies_poster.append(fetch_poster(movie_id))

    return recommended_movies,recommended_movies_poster

# Load the necessary python pickle files
movies_dict = pickle.load(open('pickle/movie_dict.pkl','rb'))
movies = pd.DataFrame(movies_dict)

similarity = pickle.load(open('pickle/similarity.pkl','rb'))
Next, we will fetch the posters of these movies by using the TMDb API. You can create your very own API by logging into the TMDb developers API-3 site. Remember to replace the API key (in line 3 below) with your own key.
# Fetch posters from the TMDb database
def fetch_poster(movie_id):
    response = requests.get('https://api.themoviedb.org/3/movie/{}?api_key=ENTER_API_KEY_HERE&language=en-US'.format(movie_id))
    data = response.json()
    return "https://image.tmdb.org/t/p/w500/" + data['poster_path']

# Web app's hero section - Display Title, Dropdown
st.title("Movie Recommender System")

selected_movie_name = st.selectbox(
'Select a movie to recommend',
movies['original_title'].values)

# Output recommendations with posters
if st.button('Recommend'):
    name, posters = recommend(selected_movie_name)

    col1, col2, col3, col4,  col5 = st.columns(5)
    with col1:
        st.text(name[0])
        st.image(posters[0])
    with col2:
        st.text(name[1])
        st.image(posters[1])
    with col3:
        st.text(name[2])
        st.image(posters[2])
    with col4:
        st.text(name[3])
        st.image(posters[3])
    with col5:
        st.text(name[4])
        st.image(posters[4])
Once our front end is ready, we can run the application locally, by opening a terminal and typing the command: ‘streamlit run app.py’. This command may take up to 30 secs before opening the Streamlit app on localhost:8501.
Step 5 — Deploy the WebApp on Azure
Now that our recommendation system is hot to trot, it’s time for us to share it with the world. To get this done we’ll be using Microsoft Azure. If you don’t already have a Microsoft Azure account, you may sign up for a free trial here.
Now, upload your files to a GitHub repository. Once your repo is ready, go to the Azure dashboard, navigate to the App Services, and select create option.
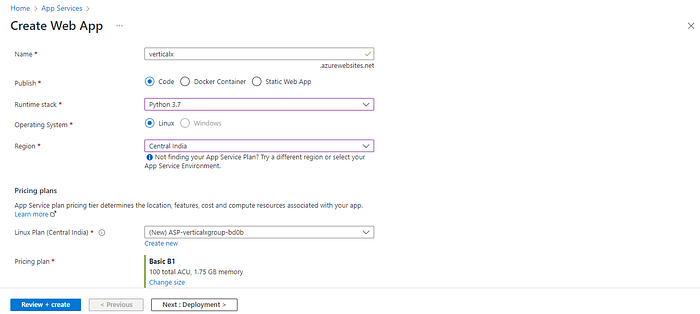
In the resource creation window, enter a unique name for your application, select the runtime stack as ‘Python 3.7’, and set the region field to any region close to you. Next, change the pricing plan by clicking on change size, and selecting the B1 tier from SpecPicker. Keep other fields to their default value.
Click on next, and move to the deployments section. Enable the continuous deployment option under GitHub actions settings. Connect your account to Azure, select your GitHub username as the organization name, and choose the repository that you created. In the branch field, select the main branch.

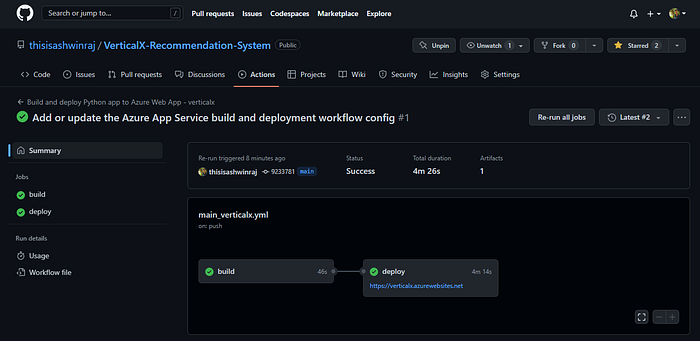
You don’t need to make any changes in the Networking and Monitoring, so simply click on ‘Review + Create’. After reviewing the changes you’ve made, hit the create button, and wait for the deployment to complete. Meanwhile, you’d notice that in our repository a new GitHub workflow starts executing.
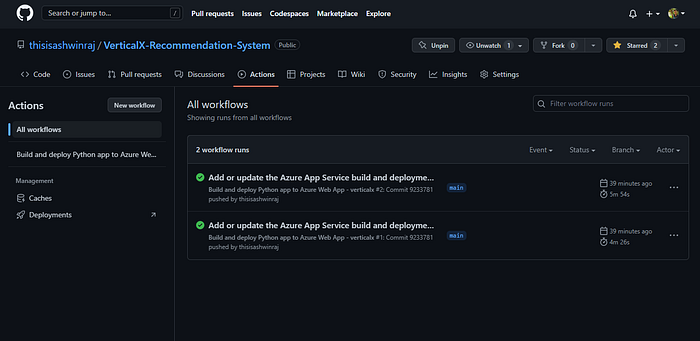
Wait for the workflow to finish executing. Now back in the Azure portal, go to the configurations section under settings, and select general settings. In the startup command field under stack settings, enter the given command:
python -m streamlit run app.py — server.port 8000 — server.address 0.0.0.0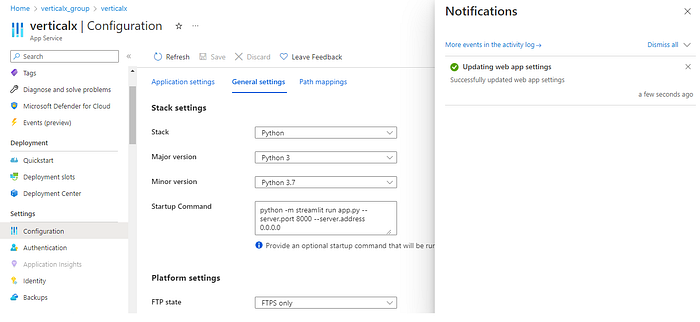
Note that pickle files used in developing the recommender system‘ll exceed the file size limit of GitHub. To upload these, you will need to use Git LFS.
Every user receives up to 1 GB of free storage and bandwidth. If you exceed this limit, you’d need to purchase an additional quota otherwise, your web app will not be able to fetch the pickle files & the web app would show error.
Once done, click on the save button and wait for the web app to be updated. Navigate back to the URL of your web app and voila, your recommendation system is now up and running. To generate a recommendation, select the movie name from the dropdown list, hit the recommend button, and wait for the recommendation system to show you its top five recommendations.
Conclusion and Final Thoughts
If you have managed to successfully reach this far, then congratulations on building your very first recommendation system, and hosting it on Azure.
You can further optimize the performance of your recommendation system by fine-tuning its parameters, or by switching to more dynamic algorithms. You can also deploy your python app after containerizing the application using Docker & Azure container registry, but that’s a lesson for another day.
With that, we have reached the end of this article. If you have any questions or believe I have made any mistake, please feel free to reach out to me! You can get in touch with me via Email or LinkedIn. Until then, happy learning.
More content at PlainEnglish.io. Sign up for our free weekly newsletter. Join our Discord community and follow us on Twitter, LinkedIn and YouTube.
Learn how to build awareness and adoption for your startup with Circuit.